Winterizing Our Travel Trailer
If you've ever spent any time in a travel trailer, then you know that the temperature inside an RV is not much warmer than it is outside. We've taken several steps to winterize our camper, which has made our living areas warmer and also more efficient to heat. Not only is our travel trailer less drafty, but our heater runs less and we consume less propane for warmth.
Curtains
The first major improvement was to replace all of the factory-installed decorative curtains with functional heavy weight curtains. We used acrylic “polar” fleece because it is a good insulating fabric and it is pretty easy to work with. Since acrylic fleece doesn't fray, it wasn't necessary to hem the edges of the curtains. While our winter curtains drastically cut down on drafts in our travel trailer, we decided to take insulation a step farther.
Insulating Windows
In the process of winterizing our home we realized that a lot of our heat was being lost through our windows – which are all single pane glass. While it would be ideal to have double or triple paned windows in our travel trailer, we have had to make do with a more realistic solution. Using double sided transparent tape we affix heavy duty plastic sheeting to most of our windows during the winter, especially those on the North side. In windows that aren't used for light, we recommend fashioning 1inch foam pieces to fill the spaces between the glass and the plastic sheeting. The foam will further increase insulation, as well as block drafts and absorb moisture. And not to overstate the obvious, but taping up cracks and making sure that windows are tightly cranked shut does a lot to keep out the cold.
Trailer Skirting
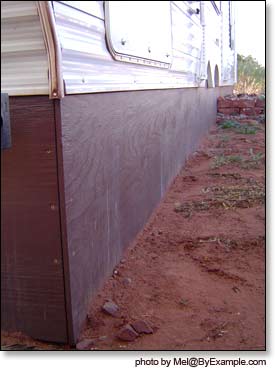
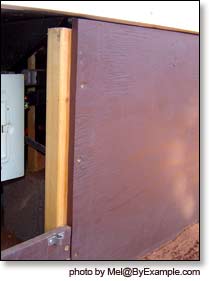
Another source of major heat loss in travel trailers is through the floor. For our first winter in the camper we did not have a trailer skirting and the floor sure was chilly at night. Last November we skirted our home with plywood. We measured between the ground and the bottom of the trailer and cut our wood pieces to be at least several inches taller. Then, we painted both sides of the plywood panels to protect them from moisture. Patrick dug a trench around the perimeter of the camper and we wedged the boards under the trailer, flush with the outer walls. As we attached each panel we secured a 2x4 to the backside, so that the next panel could be connected to it.
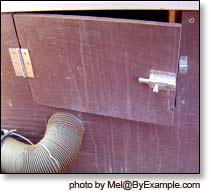
We custom cut some of the skirting panels to have hinged doors for under trailer access. Our charge controller and batteries are located under the trailer, as are the levers for emptying the gray and black water tanks. We also had to cut a hole in one panel to accommodate the existing septic line. Skirting around the trailer's wheels was also a challenge, but we were able to get the plywood paneling in place by unscrewing the plastic wheel well covers and lifting them up. We also had to remove the fold out stairs leading into our trailer to get the skirting all the way around. Once we did this, we realized that we needed to build new stairs and used nearby rocks and sand to create a large stoop.
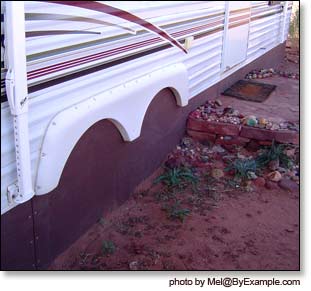
Once the trailer skirting was completely in place around our home, we buried in the trench to stabilize the structure. The skirting keeps our home from swaying in the wind, and also prevents our floors from getting cold. Now, the area under the trailer is relatively climate controlled which makes it an ideal location for batteries and storage in general.
Insulated Vent Pillows
This year we made yet another major improvement in our RV winterizing strategy. I custom made pillows to insulate all of the ceiling vents. While the vents are great for ventilating hot air in the summer, they area also one of our greatest sources of heat loss in the winter.
To make the pillows I used 1 inch foam, acrylic fleece, Reflectix insulation and a hot glue gun. The pillows are two inches deep, with fleece covering the bottoms and sides. Reflective insulation is glued to the top side of the pillow, which faces out. I cut the foam to the exact size and shape of the vents, so that the pillows wedge into place and hold themselves in position.
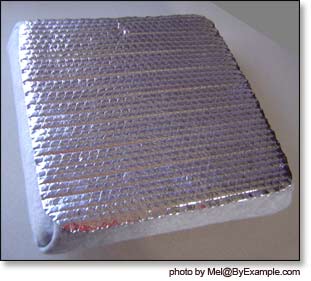
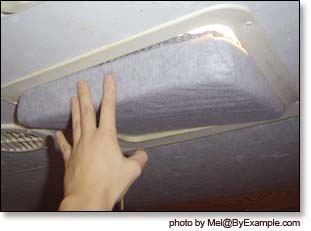
The insulated vent pillows have made a huge difference in the moderation of our indoor temperature. Not only is it much warmer at night, but the vents reflect light and heat making the trailer cooler on hot days. While you can buy vent plug pillows at an RV supply store, I've found that by making them myself I've been able to cut the price in half.
Insulating Doors and Closets
This year I have plans to make door curtains also. Like the camper windows, the doors are poorly insulated and have single paned glass. Last year I put foam insulating tape around one of our doors to cut down on drafts, but we're still losing heat right through the door. To improve our heat retention I'll be making floor length curtains out of acrylic fleece to cover the doors of both of our trailers.
All in all, we've discovered that travel trailers in general are not insulated well. We've plugged many drafty holes by shoving plastic grocery bags into uninsulated spaces behind cabinets and under the shower. We are also experimenting with lining our clothes cabinets with reflective insulation to keep our walls from sweating in the cold.
Winterizing Can Save Money
Whether you live in a conventional house or an RV, winterizing your home can drastically improve energy efficiency. Our insulating projects have yielded positive results - our heater runs much less and we are considerably warmer and drier than we were our first winter. In addition, insulating our home has contributed greatly to our fuel efficiency overall. When the furnace does kick on, we are able to hold onto our heat longer, which means we are able stay warm with less propane. The winterizing strategies we've put to use are relatively inexpensive, yet they have greatly reduced our energy needs. With the costs of both traditional and alternative energies on the rise, the most economical tactic is finding ways to use less.
More About RV Trailer Skirting
- How to Make Your Own RV Skirting
- Steps for constructing and installing a plywood trailer skirt. Includes photos from our most recent trailer skirting projects and guidelines for making your own. Trailer skirting is an essential winterizing step that greatly reduces heating inefficiencies.
- Skirting the Travel Trailer
- This article discusses the advantages of skirting a travel trailer, including increased fuel efficiency and reduced energy bills.
Travel Trailer & RV Books
For greater detail concerning the maintenance and repair of travel trailers refer to these RV guides.
To choose a greater selection of books visit the ByExample.com Bookstore. We feature a variety of books on topics that include off-grid travel trailer living, RV homesteading and sustainability.