Constructing Our Geodesic Dome
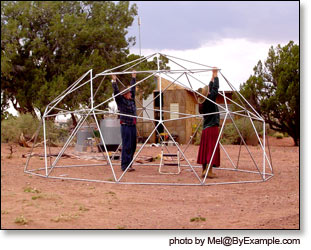 After a year of living and camping in the desert, Patrick and I decided to build a geodesic dome structure to provide us with shade and shelter from the elements. Simple picnic tents and EZ-up shelters that are commonly used just won't cut it in this desert environment. Strong and gusty winds often blow in unexpectedly and are known to mangle inadequate structures without regard. We chose to build a geodesic dome because of its inherent stability and natural resistance to strong winds.
What is a Geodesic Dome?
First we did some research on dome construction to see what materials would be needed. Geodesic domes are comprised of a network of triangles that form a somewhat spherical surface. We found that there are several dome classes that are referred to as 1V, 2V, 3V etc. The more complex the network of triangles, the more spherical the geodesic dome and the higher the class number. A 1V dome has fewer triangles, uses only one size triangle in its simple pattern, and less closely approximates a hemisphere. A 6V dome has many triangles of multiple sizes that are arranged in a complex pattern to create a more smooth and spherical shape.
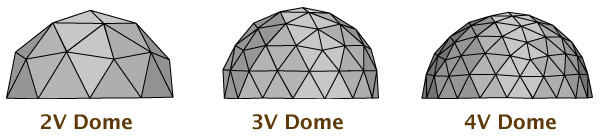
Higher class domes offer greater structural stability and are ideal for larger dome frames. After contemplating the challenges of more complex domes, we decided that a 2V dome made from EMT (electrical metallic tubing) conduit would best meet our needs and would be the most economical choice as well.
For more information on what a geodesic dome is visit wikipedia.org.
Calculating the Struts – Dome Formulas
Class 2V geodesic domes are made from struts of two different sizes. We used an online dome formula to calculate the strut lengths and to determine the ideal radius for our dome. We found that a geodesic dome with an approximate radius of 8 ft 7 inches yields the least amount of waste for a 2V structure.
Just how much conduit does it take to build a geodesic dome?Use our Geodesic Dome Calculator to calculate strut lengths and number of struts for 2V, 3V, & 4V Domes. Just put in a radius in decimal format (IE 10.25), select your units of measure and click Calculate to get the total amount of conduit needed to build your dome. |
For an 8 ft 7 inch dome we needed:
- Strut length A = 5.3 ft. (35 A struts needed)
- Strut length B = 4.7 ft. (30 B struts needed)
Because EMT conduit comes in 10 foot lengths, struts cut to these sizes result in practically no waste and much less work. Strut length A plus strut length B equals 10 feet. This means that the conduit sticks only need to be cut once to make 2 struts, and no pipe is wasted. When all of the conduit is cut there will be 5 extra B struts (to be used as spares) and no scrap.
Materials for the Geodesic Dome
- We bought 40 sticks of 3/4 inch EMT (electrical metallic tubing) conduit to make the struts. We needed exactly 35 ten foot EMT sticks, but we bought extra in order to make a few spare A struts also. We chose 3/4 inch conduit over 1 inch because it was more affordable and in the end it turned out to be plenty strong for our small dome.
- The other major dome components are the nuts, bolts and washers. We bought 3/8th inch bolts, 2 inches long; 3/8th inch hex nuts; and 3/8th inch flat washers. There are 26 joints in our dome when it is fully assembled, but we need extra hardware for the assembly process. We have determined that a minimum of 36 bolts and nuts, as well as 72 washers are needed to assemble our geodesic dome.
- Before making our geodesic dome we also bought a vice, a pipe cutter, and several 25/64 inch titanium drill bits.
Constructing the Dome
All in all, making the dome was pretty simple, once we completed our dome calculations.
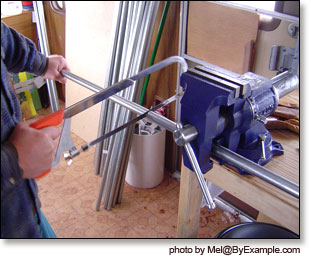
Cutting the Struts
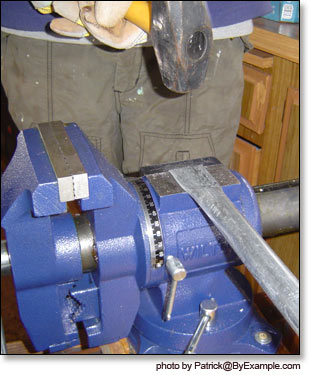
The first step in constructing the dome was to cut the EMT conduit into appropriately sized struts. We planned to cut the EMT with a pipe cutter, though it turned out that the one we purchased was broken and completely unusable. Luckily our new vice came equipped with a pipe clamp and we used the vice to hold the EMT conduit, while we cut with a hacksaw.
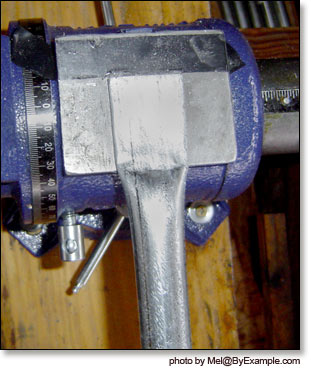
Flattening the Ends
Because we had just bought our vice we were afraid to damage it flattening EMT. Instead we used a sledge hammer to pound both ends of each strut. It made a lot of noise, but was quite effective. The most important aspect to this step is to make sure that the flattened ends are on the same plane. It is also critical to flatten the ends without splitting the conduit along its weld seam. To do this, identify the pipe seam (a dark line running the length of the pipe) and rotate pipe so that the seam does not fall directly north/south or directly east/west when flattening the end.
Our friend Jonathan used a vice to make his geodesic dome with a lot less noise and no apparent damage to the tool, I wouldn't risk it though. However, I highly recommend a hydraulic press to flatten the EMT. If you have access to one it will make the job go much faster and easier.
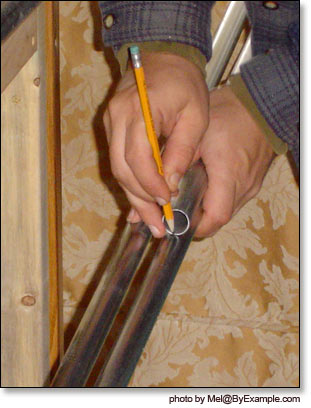
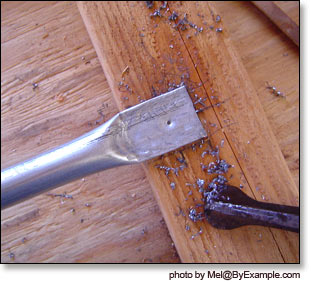
Drilling the Holes
Next, we drilled 25/64 inch diameter holes at the end of each strut. The strut lengths calculated by the dome formula allow for the holes to be drilled 3/4 of an inch away from each end. Instead of measuring 3/4 of an inch from each end, we set up a jig so that the length between holes was consistent between struts. We drilled our struts with a cordless power drill without problem, though a drill press would have made the process go a little quicker. To get the hole in desired location, we first used a punch to make a guide for the drill bit.

Bending the Struts
To make a dome out of straight lengths, each strut must have a slight angle on each flattened end. Though there are formulas to determine the exact bend, we found that the bends did not need to be precise at all. In fact, when the dome is assembled the bends will adjust themselves to the appropriate angles. To be precise a 2V dome requires the following bends: A = 18˚ and B = 16˚. We clamped each end in the vise, giving the struts a pull to make the bend.
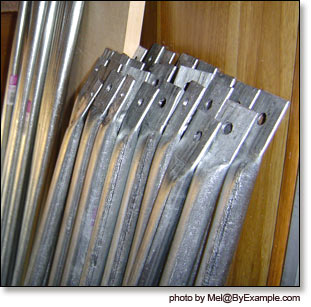
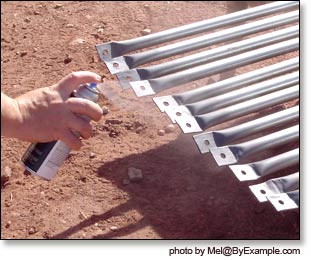
Painting the Struts
To prevent rusting we spry painted the ends of the struts, though I've recently read that EMT conduit is plated and will not rust even when left untreated. However, I recommend painting struts in order to color code the various lengths. It may not seem like a big hassle to sort the dome struts by length, but color coding really helps when assembling the dome, especially if you plan on building it with a group.
Dome Assembly
When we first assembled the dome we experimented with many methods that we found recommended online. We built it from the bottom up and from the top down. After experimenting with it for several weeks, we settled on our own favorite assembly method.
Click here to see our preferred geodesic dome assembly method.
Geodesic Dome Cover
 After completing the dome framework we custom built a form fitting cover using tarps and vinyl cement.
Click here to read our article detailing the construction of our geodesic dome cover.
To see patterns for our dome cover view the following links:
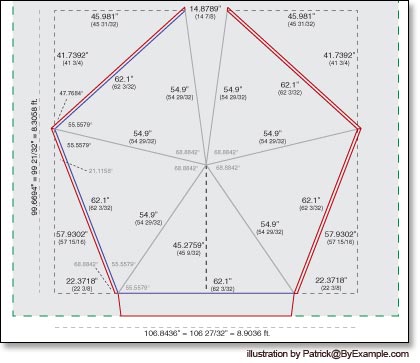
Dome Cover Pattern - Side Pentagons
Dome Cover Pattern - Top
Dome Cover Pattern - Interior Ceiling
Dome Cover Pattern - Triangle
For instructions on building your own dome cover download these PDF illustrations:
Dome Cover Pattern - Side Pentagons (PDF)
Dome Cover Pattern - Top (PDF)
Dome Cover Pattern - Interior Ceiling (PDF)
Dome Cover Pattern - Triangle (PDF)
Living in a Dome Home
Our friends the Avalons, actually live in a geodesic dome home. While it is an interesting and fun shape to live in, the dome home does has some disadvantages. The primary cover of their dome home is made from canvas, and it is insulated from the inside with Reflectix. The insulation in their geodesic dome home is minimal, which allows heat to escape quickly in the winter and raises their heating costs. In the summer, the indoor temperature is the same as the outdoor temperature, which is definitely hot in the Arizona desert. Also, the dome cover rattles with the incessant wind, making quite a racket.
The dome home is not inherently passive solar and though modifications can make it more so, true passive solar design is better suited for a long rectangular house. The Avalons are currently designing a passive solar house that will maintain a comfortable indoor temperature with minimal heating and cooling needs.

More Dome Info
For Geodesic Dome Assembly Instructions click here.
For information on making your own geodesic dome cover, click here.
To calculate dome formulas click here.
For more geodesic dome formulas visit DesertDomes.com